
AI Chatbot for Shopify: How to Add One (and Connect Your Product Catalog)
Adding an AI chatbot for Shopify store and connecting it to your live product catalog with your store's products.json feed. Free to start.
On this page
- Step 1: Create and Train Your Agent
- Connect your product catalog with a public feed URL
- Add your policies and a Q&A set
- Step 2: Embed the Widget on Your Shopify Store
- Step 3: Give It a Name and a Real Human Avatar
- Why AI ChatBot for Shopify Matters for Conversion
- Running WooCommerce or WordPress Instead?
- Get Started
Shopify makes it easy to launch a store, but it doesn't come with a way to answer the pre-purchase questions that quietly kill conversions — "does this come in a medium," "is this in stock," "what's the shipping time to Texas." An AI chatbot for Shopify closes that gap, and the setup takes less time than writing one product description.
This guide covers embedding ChatInCart on your Shopify store, and — the part most guides skip — how to connect it directly to your live product catalog so it can answer specific product questions accurately.
Step 1: Create and Train Your Agent
Sign up for a free ChatInCart account. Name your agent after your brand, describe your store in a sentence, and move on to training it — this is where Shopify stores have an advantage over most platforms.
Connect your product catalog with a public feed URL
Every Shopify store automatically exposes a public, read-only JSON feed of its products, at:
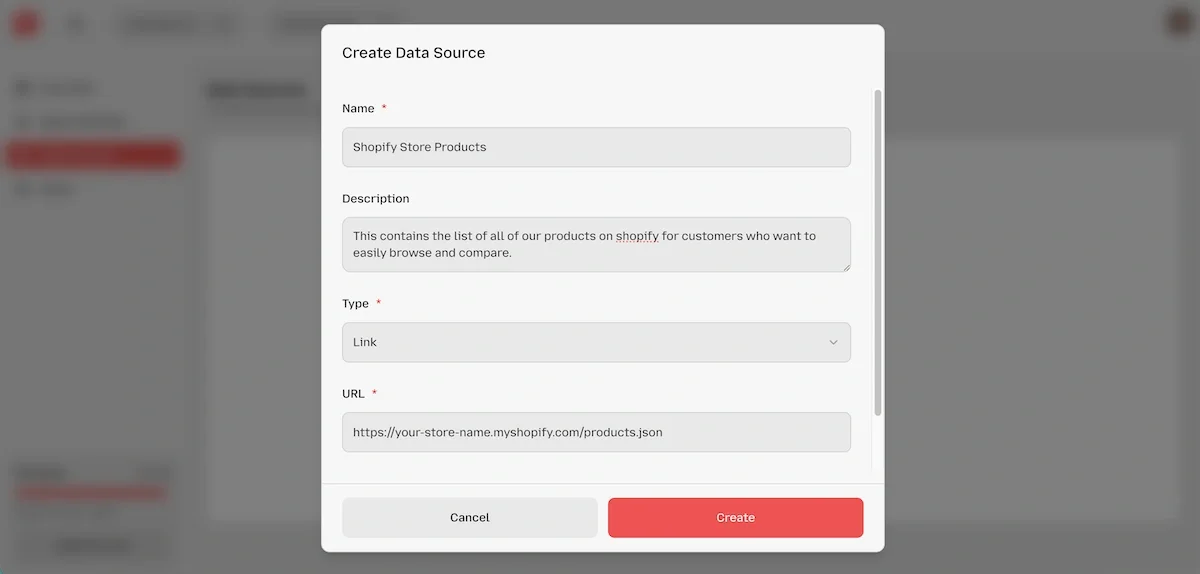
https://your-store-name.myshopify.com/products.json(or https://yourdomain.com/products.json if you're using a custom domain with the default theme setup). This feed lists your products, variants, prices, and descriptions — it's the same public data your storefront already displays, just in a structured format.
Paste this URL into ChatInCart as a data source, alongside your storefront URL, shipping policy, and return policy pages. Once it's added, your AI agent can answer specific product questions — availability, price, variant options, descriptions — pulled directly from your actual catalog, instead of generic answers.
Note: This feed only includes information that's already public on your storefront. It won't include private data like customer orders or inventory counts beyond what your theme displays.
Add your policies and a Q&A set
Round out your training with:
- Your shipping policy and return policy pages as direct URLs.
- A short manual or FAQ covering anything not obvious from your product pages (sizing charts, care instructions, warranty terms).
- A handful of manually written Q&A pairs for your most common pre-sale questions.
Step 2: Embed the Widget on Your Shopify Store
Shopify supports custom scripts across its themes, and you have two straightforward options:
Option A — Edit your theme code directly
- From your Shopify admin, go to Online Store → Themes.
- Click the ⋯ menu next to your active theme and choose Edit code.
- Open
theme.liquidfrom the Layout folder. - Paste your ChatInCart embed snippet immediately before the closing
</head>tag. - Save. The widget now loads on every page of your store, in both the header (script) and rendering in the footer of the page automatically.
Option B — Use a Custom Pixel or app embed If your theme restricts direct code edits, Shopify's Custom Pixels (under Settings → Customer events) or a theme's App embeds panel (Online Store → Themes → Customize → App embeds) can also load third-party scripts without editing theme files directly — check your theme's documentation for which one it supports.
Either way, once it's live, test it by opening your storefront in an incognito window and confirming the chat widget appears.
Step 3: Give It a Name and a Real Human Avatar
This is a small step that shoppers notice more than you'd expect. In your ChatInCart dashboard, replace the default bot icon with a real, friendly-looking avatar and give your agent a name that fits your brand voice — "Ask Jordan" reads very differently to a shopper than an unlabeled chat icon. A human-feeling avatar lowers the perceived friction of asking a question, which matters most exactly when a shopper is on the fence about buying.
Why AI ChatBot for Shopify Matters for Conversion
The moment a shopper hesitates on a product page — unsure about sizing, unsure about delivery time, unsure if it's really in stock — is the moment they either ask a question or leave. Most leave. Industry research on ecommerce chatbots points to conversion lifts as high as 30% specifically because the assistant is there to answer that hesitation in real time, right where the shopper already is, instead of routing them to a contact form they'll never fill out.
Connecting your actual product feed (rather than relying on generic training) is what makes the difference between a chatbot that says "please check the product page" and one that says "yes, that's available in medium and ships in 2–3 days" — the answer that actually closes the sale.
Running WooCommerce or WordPress Instead?
If your store runs on WooCommerce rather than Shopify, the same idea applies but the product feed is different — see our AI chatbot for WooCommerce guide for the exact public endpoint to use. For a broader look at chatbots across all ecommerce platforms, read our AI chatbot for ecommerce guide, or our general AI chatbot for WordPress setup if you're using WordPress for a non-store site.
Get Started
- Create a free ChatInCart account.
- Add
https://your-store.myshopify.com/products.jsonas a data source, along with your policies. - Paste the embed script into
theme.liquidor your theme's app embeds. - Name your agent and give it a real avatar.
Start free — no credit card required — or view pricing once you're ready to scale past the free tier's message limit.